Showing posts with label technique. Show all posts

6.15.2009

Balsamic Vinaigrette

Today's picture includes mustard - not because mustard is the topic of the post, but rather because it is the less obvious of the two ingredients used to make this incredibly simple vinaigrette.

I've already told you about my conversion to do-it-yourself salad dressing...and I've waxed poetic about a good balsamic vinegar. Now I'm putting the two topics together with this quick recipe for a balsamic vinaigrette. All that's needed is a quality balsamic vinegar and a jar of Dijon mustard...and maybe some exceptional olive oil. That's it! This balsamic vinaigrette will remind you why you bought that fancy bottle (as if you needed reminding!).

Simple Balsamic Vinaigrette

1 Part Dijon Mustard
3 Parts Balsamic Vinegar
1/2 Part Extra Virgin Olive Oil (Optional)

Whisk the Dijon and balsamic vinegar together in a bowl until smooth. Taste and adjust as necessary. For added richness, whisk in the olive oil. Serve immediately or refrigerate before use.

6.01.2009

Pita Sandwich with Cucumber and Hummus

During lunch with a colleague last week, the conversation turned to cucumbers (What can I say? I love to eat food. I love to talk about food. I love to talk about food while I eat food...). Specifically, the discussion centered around cucumbers as a sandwich ingredient, and a most divine sandwich ingredient at that. Thoughtfully, I pondered my tuna-with-cucumber-and-sprouts on French bread. What is it about a cucumber that makes it such a wonderful addition to a sandwich? And, since a few slices of cucumber can literally transform a sandwich, why isn't its use as a topper more ubiquitous?

I can't answer the second question. But, since my forays into the world of cucumber-laden sandwiches were born not from a search for flavor, but rather from a more practical place, I can attempt a response to the first. A cucumber on a sandwich functions much like lettuce - crunchy and refreshing, with an unmistakable flavor that says "veggie". But unlike lettuce, the cucumber has more of all of this - more of a structured crunch, more of a refreshing sensation, more of that vegetal "green-ness". Which gets to why I started putting cucumbers on my sandwiches... Quite simply, they were a great replacement for wilt-prone lettuce when I was shopping for one! The pita sandwich below was, and still is, one of my staples in a pinch and highlights the cucumber nicely.


Pita Sandwich with Cucumber and Hummus
(makes 2)

1 medium-sized pita, halved crosswise to form two pockets
1/4 english cucumber (about 4 inches), sliced thin
1 medium vine tomato
2 oz. pepper jack cheese, sliced (you can also use a good, creamy feta - I love Trader Joe's brand)
4 T roasted red pepper hummus*

Carefully open each pita half and spread the hummus evenly around the inside of the pocket. Arrange the cheese slices along one side of the pocket, using the hummus to keep them in place. Do the same with the cucumber slices on the other side of the pocket. Slice the tomato and place the slices between the cheese and cucumber to complete the sandwich.

*Of course, there is no reason a traditional hummus wouldn't work in this sandwich just as well, as would a different flavor. I like to use jalapeno hummus when I am craving even more of a "kick".

4.28.2009

Poached-Egg Topper

Originally, I didn't make this salad for garlic.pepper.parsley, but because I was hungry! It was so pretty when it was done, though, that I couldn't help but take a picture. Then, while looking at the picture, it came to me that maybe this little quick-meal trick of mine might be useful to others, so I decided to post it.


If it seems odd to put a poached egg on top of a salad, I have to ask you to suspend your disbelief for just a moment and stay with me. When I was still cooking for one, not to mention trying to maintain my pre-wedding weight, this dish made a frequent appearance on my table. Why? Because it's light, reasonably balanced, easy to make, and a good way to use up vegetables (and eggs) before they go bad in the refrigerator! And, the added protein from the egg really turns the salad into a meal. You can add dressing to the salad before adding the egg if you'd like (a light vinaigrette works well), but you don't need to, because the runny egg yolk makes a nice dressing by itself. As always, I'd recommend adding a few turns from the pepper grinder as well.

Poaching an egg is not the easiest thing to do, but it also isn't hard if you use my method. The end result may not be the most beautiful thing ever, but it works! I just fill a very small frying pan about 2/3 full with water and add a splash or two (about 1 tsp.) of vinegar. Then, I heat the water on medium until bubbles start to form on the bottom and sides of the pan. I crack the egg into a separate bowl and drop it into the center of the pan. While the sides of the egg white cook, I spoon water over the top of the egg until the white turns opaque over the yolk. Then, I use a slotted spoon to remove the egg and place it on a paper towel for a couple of minutes to drain. That's it!

If you still just can't bring yourself to put that egg on top of a salad, try it on pasta! The yolk works as a great simple sauce. And, "an egg on top" is a popular food trend this year, so you'll be on the cutting edge!

4.13.2009

Simple Lemon Vinaigrette

I first made this vinaigrette out of necessity. Faced with a beautiful, but bare, freshly prepared salad and a refrigerator conspicuously devoid of the proper dressing, what else could I do? Fortunately, I always keep a lemon or two on hand. I whipped up this quick dressing and, since then, I make my own vinaigrette just as often as I buy it. This is the perfect dressing for the fresh baby lettuces, sprouts, and micro-greens that are showing up at the spring farmers' markets right about now. Using a good, green salad-grade olive oil makes all the difference.

Simple Lemon Vinaigrette

1/2 Lemon
1 tsp Honey
2-3 T Extra Virgin Olive Oil
Pinch of Salt
Freshly Ground Black Pepper

Squeeze the juice of the lemon into a medium-sized bowl. Add the honey, salt, and pepper to taste. Slowly stream in the olive oil, while whisking the mixture until combined. Taste and adjust as necessary.

To serve, add fresh salad greens to the bowl and toss.

3.28.2009

Sweet Potato Fries

I have to admit that at first I thought sweet potato fries might be too basic to warrant a post of their own. But, after finding out last week that several of my acquaintances had never even thought of making the simple sweet and savory fries from scratch, I quickly reconsidered. These are the perfect thing to dip in your Chipotle & Date Chutney! And, since my version is actually made in the oven, they're slightly healthier than your standard freezer section variety. One large sweet potato makes a substantial side dish for two.

Sweet Potato Fries

1 Large Sweet Potato
1 T Vegetable Oil
Kosher Salt
Freshly Ground Pepper

Preheat the oven to 400 degrees. While the oven is preheating, peel the sweet potato and slice off the sides and ends to form a square (you do not have to cut off these curved parts, or peel the potato for that matter, but remember that the more evenly sized your fries are, the less likely they are to burn). Cut the squared-off potato lengthwise to form sticks as long as the potato and about 1/2 inch square in thickness. Put the oil in the bottom of a medium-sized bowl and add the potato, tossing to coat each stick with the oil. By this time, the oven should be up to temperature. Place an empty baking sheet in the oven and allow it to heat for about 15 minutes, while the potatoes absorb the oil. After 15 minutes, remove the baking sheet from the oven (don't forget to use oven mitts!), and place the potatoes on the sheet in one layer. Sprinkle generously with salt and pepper. Place the baking sheet in the oven for about 20 minutes, then flip the potatoes with a spatula and bake for another 20 minutes. Make sure you watch them while they are baking because the high sugar content can make them prone to burn! The fries are done when they are crisp, separate from the pan easily, and are beginning to look like they are edged with brown sugar.

3.12.2009

Croutons

Making croutons is a great way to use up stale or almost-stale bread. Once you've made your own, you will never even consider buying them again! Plus, they last a while on the shelf, which is always a bonus for anything homemade. The basic technique is to cube four or five slices of bread, cutting down and across to form about one-inch square cubes. Then, put about a tablespoon of olive oil in the bottom of a mixing bowl, add the bread cubes, and toss to cover with the olive oil. After the cubes are relatively evenly covered with the oil, you can add seasoning as well. Most often, I just add some kosher salt (about 1/8 tsp.) and a little freshly ground black pepper, but you can add whatever you'd like to make them fun and interesting. I sprinkled in a little bit of fresh thyme when I was making the croutons in the picture, and it worked quite nicely. After the bread is fully oiled and seasoned, spread the cubes out flat onto a baking sheet and slide them into a preheated oven to toast at 375 degrees until nicely browned, about 10-15 minutes. I've made croutons with all kinds of bread and seasoning, and each combination brings its own unique flavor to the crouton. It's great to know exactly what has gone into making them (how much oil, what kind of seasoning, etc.) as well, so I am not shy about stretching their use way beyond salads to other things that may need a little crunch - like the cauliflower soup! Try this technique before your next loaf goes bad.

3.01.2009

Naturally Flavored Water

Choosing everyday beverages sometimes seems a little tricky to me. Though I'll admit that I might love to, I can't drink wine, coffee, or tea all of the time. Because of the sugar, I try to make fruit juice an occasional, and preferably freshly-squeezed, indulgence. Soda's triple-whammy of sugar, caffeine, and chemicals severely limits its appearances in my diet. Even drinks like Crystal Light make me stop and consider how much Red 40 I would really like to be consuming. But let's face it, there is only so much water one can drink before it starts to get, well, a bit boring. When I start to feel bored with my water, I use a trick that my friend Amy taught me to add just a bit of subtle and interesting flavor, naturally and without the addition of a load of extra calories. It's really a variation of the ubiquitous lemon in the water, and is a great way to use up fresh herbs from the package you bought for the recipe and that called for one sprig! The idea is to pair a fruit (or vegetable) and an herb to flavor your water. The water quickly takes on not only the taste of the fruit, but also that of the herb, in a delicate and pleasing way. My favorite combination is orange and rosemary, which I made a whole pitcher of today, but many other pairings work just as well. For a medium-sized water bottle, I usually use just two or three slices of the fruit, and one or two sprigs of the herb; That's really all you need. Bruising the herb a bit will bring out more of the flavor, but is not required. Definitely try the orange rosemary version. For more variety, though, here are some other versions that I like too:

Lemon/Basil
Lime/Cilantro
Cucumber/Mint

2.08.2009

Oatmeal with Dried Fruit

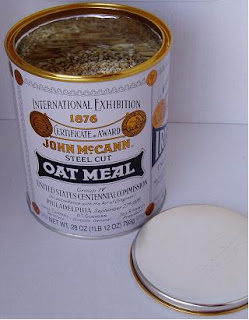
Lately, every weekend I spend in Chicago invariably culminates with brunch at Milk & Honey Cafe. And inevitably, someone always orders the delicious Warm Oatmeal with Dried Cherries, Toasted Walnuts and Brown Sugar. I don't know Milk & Honey's secret, but this morning I decided to make a breakfast inspired by the cafe's popular dish. I used Irish-made John McCann's Steel Cut Irish Oatmeal, which comes in a great throw-back can. The brand is a bit expensive, but if you don't mind sacrificing the cool can, there are other more affordable options out there. I have to say that just opening the can hightened my anticipation! The oats have a great sweet-grain smell that far surpasses anything out of an instant package. I prepared them according to the instructions on the can:

Sprinkle one cup oatmeal into four cups briskly boiling water, stirring well. When the porridge is smooth and beginning to thicken (about 7 or 8 minutes), reduce heat and simmer for 30 minutes (actually, more like 20-25 minutes, in my experience), stirring occasionally.

You could really stop there - it is delicious as is. But, of course, I had to follow Milk & Honey's lead and embellish it.

I added an almost imperceptible amount of brown sugar, a few taps of nutmeg, a handful of dried cranberries, a handful of golden raisins, and half of a handful of walnut quarters.

Yum! It was such a filling and satisfying winter meal. You could use any dried fruits that you have on hand, and omit the nuts if desired, since the steel cut oats are already "nutty" tasting. The walnuts do add to the flavor if you have them, though, and I would recommend always including the golden raisins. The combination of golden raisins and nutmeg is pure harmony. Also, the sugar could be adjusted or replaced with honey, but I don't think you need much (or possibly even any), since the fruit adds sweetness.

1.20.2009

Roasted Garlic

Admittedly, I have a bit of an affinity for garlic (reference title block!). But even if you are not as into garlic as I am, it is worth it to consider roasting a head. Why? Because roasting the garlic carmelizes the sugars and mellows out the "bite", leaving you with a smooth, flavorful, sweet/savory morsel - perfect to use as a flavoring, or even as a spread. If you are trying to limit the saturated fat in your diet, roasted garlic is for you! It is great on bread instead of butter. But don't let that deter you - this isn't "diet food". You can also use it to make fancy appetizers, pasta dishes, mashed potatoes...the list goes on and on. I like to roast mine at a lower temp - around 350 degrees - due to the low smoke point of the olive oil. The technique is easy:

1. Heat oven to 350 degrees.

2. Cut a slice off the root end of the head of garlic to make a flat surface. Leave the paper on.

3. Cut the top off the garlic to expose the cloves.

4. Set the garlic on a baking sheet or in a small baking pan.

5. Pour about 1/2 teaspoon of olive oil over the cloves. Let soak in for a couple of minutes.

6. Pour another1/2 teaspoon of olive oil over the cloves.

7. Cover with tin foil.

8. Roast for about 45 minutes.


When it is done, the garlic cloves should be toasty brown and soft. Remove them from the paper with a small fork/spoon, or just extract them with your hands. Enjoy!